Todd Smith Org

March 29, 2009

Certificate and Key management with OpenSSL

Filed under: Unix Administration,Web Hosting — admin @ 9:29 pm

Generate a Certificate Signing Request (CSR)

If you want to provide secure communications between your webserver and the clients that visit your website, you’re going to need an SSL certificate (SSLCert) signed by a well-known Certificate Authority (CA).

I’m just gonna outline the process of generating one.

Prerequisites:

  1. OpenSSL
  2. Domain Name
  3. Entity information (Name, Address, Etc..)

Steps

Create a CSR in 3 easy steps

  1. Use this command to create your working directory, and change to it so you’ve got everything in one place. You can change my_certs to anything you want.

    mkdir my_certs && cd my_certs

  2. Use this command to generate an encrypted private key. If you enter a pass-phrase here, you’ll need to use it any time you start-up your web-server. You should enter a pass-phrase here. We can remove it later. If you lose or forget the pass-phrase, you’re gonna have to do all this over again… And you might have to purchase another certificate from your provider.

    openssl genrsa -des3 -out toddsmith.org.key 1024

  3. Next use this command to create a CSR from the RSA private key. You cannot use any special characters (< > ~ ! @ # $ % ^ * / \ ( ) ?.,&). You’ll need the following information:
    • Common Name: This is the full name of your website. For example: www.toddsmith.org
    • Organization: Your name or the legal name of your company.
    • Organization Unit: The department you work in or this server provides service for: For example: IT Services
    • City: The City you or your organization is in.
    • State: The State you or your organization is in.
    • Country: The 2 letter abbreviation of your country

    openssl req -new -key toddsmith.org.key -out toddsmith.org.csr

Remove Encryption from Private Key

Use the following steps to remove encryption from the private key for use with dovecot, sendmail or to remove the start-up pass phrase dialog from apache, etc…

  1. Make a backup of the key file

    cp toddsmith.org.key toddsmith.org.key.encrypted

  2. Make a backup of the key file

    openssl rsa -in toddsmith.org.key.encrypted -out toddsmith.org.key

The -out file toddsmith.org.key is now your unencrypted private key. Lose it, and anyone can use it now.

Use certificate for Microsoft Internet

Now you’ve received your certificate from your provider and you want to use it for Internet

To use the certificate you just created for Internet Explorer, you have to convert it to the PFX format. It’s currently in PEM format.

  1. To create a PFX formatted certificate/key combination. The following command is one line.

    openssl pkcs12 -export -out toddsmith.org.pfx -inkey \ toddsmith.org.key -in toddsmith.org.crt

Convert key and certificate to use with Sendmail, Dovecot, or others

To do this, you’ll need the certificate issued from your Certificate Authority, and your unencrypted key file. If your key is still encrypted, use the process above to remove the encryption from the key.

All set? Okay let’s do it.

  1. Run the following command to combine the key and certificate for use with Sendmail, Dovecot, uw-imap, and many others

    cat toddsmith.org.key toddsmith.org.crt > toddsmith.org.pem

All done, now you can use it with your favorite MTA, or Email software.

March 28, 2009

iptables troubleshooting

Filed under: Uncategorized — admin @ 12:49 pm

Troubleshooting

iptables v1.4.2: Unknown arg `(null)’

Try adding -p to the equation

root@host:~# iptables -I OUTPUT –dport 6660:6669 -j DROP
iptables v1.4.2: Unknown arg `(null)’
Try `iptables -h’ or ‘iptables –help’ for more information.
root@host:~# iptables -I OUTPUT -p tcp –dport 6660:6669 -j DROP
root@host:~#

Unix, Linux and BSD find tricks

Filed under: Unix Administration — admin @ 11:34 am

I’m gonna show you some tricks here that I’ve learned over the years. I hope they help.

Find files named yahoo.com owned by user user

find /dev -user d0ncortez -name ‘yahoo.com’

Find files named CorteZ owned by the group Linux-Team

find /dev -group Linux-Team -name ‘CorteZ’

Find all files on the file-system with the SETUID bits set

find / -perm +4000 -print

Print a list of all directories

find / -type f -print

Print a list of files only

find / -type f -print

Delete all files owned by a specific user

find / -user mean-person -exec rm -rf {} \;

Fix directory permissions on a bunch of directories

find / -type f -exec chmod 644 {} \;
find / -type d -exec chmod 755 {} \;

March 23, 2009

Setup Trac on Ubuntu via APT

Filed under: Uncategorized — admin @ 10:30 pm

HOWTO Setup Trac on Ubuntu via APT

Installing Trac

Comments (1)

March 21, 2009

Sendmail and smrsh nightmares

Filed under: Server Technology — admin @ 7:52 pm

I spent a good hour or almost at least trying to figure this out. What a pain….

Basically, I was trying to setup the ability for Ubersmith to receive mails to the alias that they have you create during installation. For most installations this should probably be pretty straight forward:

But I kept getting this error in my mail.log file:

Mar 22 01:37:38 support smrsh: uid 25: attempt to use “php -q -f /vhosts/support.domain.dom/htdocs/cron/gateway.php support.domain.dom 1″ (stat failed)
Mar 22 01:37:38 support sm-mta[22733]: n2M1aRGF022722: to=”|php -q -f /vhosts/support.domain.dom/htdocs/cron/gateway.php support.domain.dom 1″, ctladdr= (25/0), delay=00:00:36, xdelay=00:00:00, mailer=prog, pri=13679, dsn=5.0.0, stat=Service unavailable
Mar 22 01:37:38 support sm-mta[22733]: n2M1aRGF022722: n2M1bcGG022733: DSN: Service unavailable

Here’s our mail alias:

support: “|php -q -f /vhosts/support.domain.dom/htdocs/cron/gateway.php support.domain.dom 1″

So the usual solution would be to do the following:

cd /etc/mail
ln -s /path/to/php php

However, that wasn’t working…. Most likely because my php executable is not in some search path for smrsh.

Finally I discovered this /usr/adm/sm.bin!

root@support:/usr/adm/sm.bin# strings `which smrsh` | grep usr
/usr/adm/sm.bin
/bin:/usr/bin:/usr/ucb
root@support:/usr/adm/sm.bin#

Well, what have we here? /usr/adm/sm.bin looks a little foreign to me.
Obviously the second line is my hard-coded path, which it looks like smrsh thought it was on a sun platform during compile time, but whatever….

So let’s have a look at the docs… They read…

If your platform doesn’t have a default SMRSH_CMDDIR setting, you will
next need to create the directory /usr/adm/sm.bin and populate
it with the programs that your site feels are allowable for sendmail
to execute. This directory is explicitly specified in the source
code for smrsh, so changing this directory must be accompanied with
a change in smrsh.c.

Let me try that. It’s worth a shot.

mkdir -p /usr/adm/sm.bin
cd !$
ln -s /opt/bin/php
ls -aFl

root@support:/usr/adm/sm.bin# ls -aFl
total 0
drwxr-xr-x 2 root root 72 Mar 21 18:39 ./
drwxr-xr-x 3 root root 72 Mar 21 18:38 ../
lrwxrwxrwx 1 root root 24 Mar 21 18:39 php -> /opt/bin/php*
root@support:/usr/adm/sm.bin#

Now my mail.log looks a little bit more like expected….

Mar 22 02:47:44 support sm-mta[23613]: n2M2jvox023571: to=”|php -q -f /vhosts/support.domain.dom/htdocs/cron/gateway.php support.domain.dom 1″, ctladdr= (25/0), delay=00:01:12, xdelay=00:00:01, mailer=prog, pri=5357, dsn=2.0.0, stat=Sent

I hope you found this helpful

March 18, 2009

Setup AWStats on Linux with Custom Apache

Filed under: Web Hosting — admin @ 9:45 pm

I need to install awstats. I am too lazy tonight to go and install the package myself, so I’ll just use apt.

Update: This was going to be for Ubuntu, but will work on any Unix include Solaris, HP-UX, FreeBSD, OpenBSD, Slackware, CentOS…… Whatever.

Installation

wget http://superb-east.dl.sourceforge.net/sourceforge/awstats/awstats-6.9.tar.gz
mkdir /opt
tar zxvf awstats-6.9.tar.gz -C /opt
ln -sf /opt/awstats-6.9 /opt/awstats

Now, it’s installed. Time to Configure.

Configuration

cd /opt/awstats
perl tools/awstats_configure.pl

root@function:/opt/awstats# perl tools/awstats_configure.pl

—– AWStats awstats_configure 1.0 (build 1.8) (c) Laurent Destailleur —–
This tool will help you to configure AWStats to analyze statistics for
one web server. You can try to use it to let it do all that is possible
in AWStats setup, however following the step by step manual setup
documentation (docs/index.html) is often a better idea. Above all if:
- You are not an administrator user,
- You want to analyze downloaded log files without web server,
- You want to analyze mail or ftp log files instead of web log files,
- You need to analyze load balanced servers log files,
- You want to ‘understand’ all possible ways to use AWStats…
Read the AWStats documentation (docs/index.html).

—–> Running OS detected: Linux, BSD or Unix
Warning: AWStats standard directory on Linux OS is ‘/usr/local/awstats’.
If you want to use standard directory, you should first move all content
of AWStats distribution from current directory:
/opt/awstats-6.9
to standard directory:
/usr/local/awstats
And then, run configure.pl from this location.
Do you want to continue setup from this NON standard directory [yN] ?
root@function:/opt/awstats# perl tools/awstats_configure.pl

—– AWStats awstats_configure 1.0 (build 1.8) (c) Laurent Destailleur —–
This tool will help you to configure AWStats to analyze statistics for
one web server. You can try to use it to let it do all that is possible
in AWStats setup, however following the step by step manual setup
documentation (docs/index.html) is often a better idea. Above all if:
- You are not an administrator user,
- You want to analyze downloaded log files without web server,
- You want to analyze mail or ftp log files instead of web log files,
- You need to analyze load balanced servers log files,
- You want to ‘understand’ all possible ways to use AWStats…
Read the AWStats documentation (docs/index.html).

—–> Running OS detected: Linux, BSD or Unix
Warning: AWStats standard directory on Linux OS is ‘/usr/local/awstats’.
If you want to use standard directory, you should first move all content
of AWStats distribution from current directory:
/opt/awstats-6.9
to standard directory:
/usr/local/awstats
And then, run configure.pl from this location.
Do you want to continue setup from this NON standard directory [yN] ? y

—–> Check for web server install

Enter full config file path of your Web server.
Example: /etc/httpd/httpd.conf
Example: /usr/local/apache2/conf/httpd.conf
Example: c:\Program files\apache group\apache\conf\httpd.conf
Config file path (‘none’ to skip web server setup):
> /opt/apache/conf/httpd.conf

—–> Check and complete web server config file ‘/opt/apache/conf/httpd.conf’
Warning: You Apache config file contains directives to write ‘common’ log files
This means that some features can’t work (os, browsers and keywords detection).
Do you want me to setup Apache to write ‘combined’ log files [y/N] ? y
Add ‘Alias /awstatsclasses “/opt/awstats-6.9/wwwroot/classes/”‘
Add ‘Alias /awstatscss “/opt/awstats-6.9/wwwroot/css/”‘
Add ‘Alias /awstatsicons “/opt/awstats-6.9/wwwroot/icon/”‘
Add ‘ScriptAlias /awstats/ “/opt/awstats-6.9/wwwroot/cgi-bin/”‘
Add ‘<Directory>’ directive
AWStats directives added to Apache config file.

—–> Update model config file ‘/opt/awstats-6.9/wwwroot/cgi-bin/awstats.model.conf’
File awstats.model.conf updated.

—–> Need to create a new config file ?
Do you want me to build a new AWStats config/profile
file (required if first install) [y/N] ? y

—–> Define config file name to create
#
What is the name of your web site or profile analysis ?
Example: www.mysite.com
Example: demo
Your web site, virtual server or profile name:
> www.toddsmith.org

—–> Define config file path
In which directory do you plan to store your config file(s) ?
Default: /etc/awstats
Directory path to store config file(s) (Enter for default):
>

—–> Create config file ‘/etc/awstats/awstats.www.toddsmith.org.conf’
Config file /etc/awstats/awstats.www.toddsmith.org.conf created.

—–> Restart Web server with ‘/etc/init.d/apache restart’
Stopping Apache…OK
Starting Apache…OK

—–> Add update process inside a scheduler
Sorry, configure.pl does not support automatic add to cron yet.
You can do it manually by adding the following command to your cron:
/opt/awstats-6.9/wwwroot/cgi-bin/awstats.pl -update -config=www.toddsmith.org
Or if you have several config files and prefer having only one command:
/opt/awstats-6.9/tools/awstats_updateall.pl now
Press ENTER to continue…

A SIMPLE config file has been created: /etc/awstats/awstats.www.toddsmith.org.conf
You should have a look inside to check and change manually main parameters.
You can then manually update your statistics for ‘www.toddsmith.org’ with command:
> perl awstats.pl -update -config=www.toddsmith.org
You can also read your statistics for ‘www.toddsmith.org’ with URL:
> http://localhost/awstats/awstats.pl?config=www.toddsmith.org

Press ENTER to finish…

root@function:/opt/awstats#

Now I feel like my httpd.conf has just been molested, I’m gonna go fix it. The following was added:

#
# Directives to allow use of AWStats as a CGI
#
Alias /awstatsclasses “/opt/awstats-6.9/wwwroot/classes/”
Alias /awstatscss “/opt/awstats-6.9/wwwroot/css/”
Alias /awstatsicons “/opt/awstats-6.9/wwwroot/icon/”
ScriptAlias /awstats/ “/opt/awstats-6.9/wwwroot/cgi-bin/”

#
# This is to permit URL access to scripts/files in AWStats directory.
#
<Directory “/opt/awstats-6.9/wwwroot”>
Options None
AllowOverride None
Order allow,deny
Allow from all
</Directory>

I’m gonna change this up a little bit, make it easier to manage, and easier to upgrade at the same time.

cat<<EoF>/opt/apache/conf/awstats.conf

#
# Directives to allow use of AWStats as a CGI
#
Alias /awstatsclasses “/opt/awstats/wwwroot/classes/”
Alias /awstatscss “/opt/awstats/wwwroot/css/”
Alias /awstatsicons “/opt/awstats/wwwroot/icon/”
ScriptAlias /awstats/ “/opt/awstats/wwwroot/cgi-bin/”

#
# This is to permit URL access to scripts/files in AWStats directory.
#
<Directory “/opt/awstats/wwwroot”>
Options SymLinksIfOwnerMatch
AllowOverride AuthConfig FileInfo
Order deny,allow
Allow from all
AuthName “AWStats”
AuthType Basic
AuthUserFile /vhosts/auth/webadmin.pwd
require valid-user
</Directory>

EoF

So I made myself a custom configuration file, and a complementary script. This works well for me because I keep all my virtual hosts in /vhosts and their logs under log/xfer_log.

Awstats Configuration File

LogFile=”/vhosts/REPLACE_ME/log/xfer_log”
LogType=W
LogFormat=1
LogSeparator=” ”
SiteDomain=”REPLACE_ME”
HostAliases=”REPLACE_ME www.REPLACE_ME 127.0.0.1 localhost”
DNSLookup=2
DirData=”/vhosts/REPLACE_ME/htdocs/stats”
DirCgi=”/awstats”
DirIcons=”/awstatsicons”
AllowToUpdateStatsFromBrowser=0
AllowFullYearView=3
EnableLockForUpdate=0
DNSStaticCacheFile=”dnscache.txt”
DNSLastUpdateCacheFile=”dnscachelastupdate.txt”
SkipDNSLookupFor=”"
AllowAccessFromWebToAuthenticatedUsersOnly=1
AllowAccessFromWebToFollowingAuthenticatedUsers=”webadmin awstats”
AllowAccessFromWebToFollowingIPAddresses=”"
CreateDirDataIfNotExists=0
BuildHistoryFormat=text
BuildReportFormat=html
SaveDatabaseFilesWithPermissionsForEveryone=0
PurgeLogFile=0
ArchiveLogRecords=0
KeepBackupOfHistoricFiles=0
DefaultFile=”index.html”
SkipHosts=”"
SkipUserAgents=”"
SkipFiles=”"
SkipReferrersBlackList=”"
OnlyHosts=”"
OnlyUserAgents=”"
OnlyUsers=”"
OnlyFiles=”"
NotPageList=”css js class gif jpg jpeg png bmp ico rss xml swf”
ValidHTTPCodes=”200 304″
ValidSMTPCodes=”1 250″
AuthenticatedUsersNotCaseSensitive=0
URLNotCaseSensitive=0
URLWithAnchor=0
URLQuerySeparators=”?;”
URLWithQuery=0
URLWithQueryWithOnlyFollowingParameters=”"
URLWithQueryWithoutFollowingParameters=”"
URLReferrerWithQuery=0
WarningMessages=1
ErrorMessages=”"
DebugMessages=0
NbOfLinesForCorruptedLog=50
WrapperScript=”"
DecodeUA=0
MiscTrackerUrl=”/js/awstats_misc_tracker.js”
LevelForBrowsersDetection=2 # 0 disables Browsers detection.
# 2 reduces AWStats speed by 2%
# allphones reduces AWStats speed by 5%
LevelForOSDetection=2 # 0 disables OS detection.
# 2 reduces AWStats speed by 3%
LevelForRefererAnalyze=2 # 0 disables Origin detection.
# 2 reduces AWStats speed by 14%
LevelForRobotsDetection=2 # 0 disables Robots detection.
# 2 reduces AWStats speed by 2.5%
LevelForSearchEnginesDetection=2 # 0 disables Search engines detection.
# 2 reduces AWStats speed by 9%
LevelForKeywordsDetection=2 # 0 disables Keyphrases/Keywords detection.
# 2 reduces AWStats speed by 1%
LevelForFileTypesDetection=2 # 0 disables File types detection.
# 2 reduces AWStats speed by 1%
LevelForWormsDetection=0 # 0 disables Worms detection.
# 2 reduces AWStats speed by 15%
UseFramesWhenCGI=1
DetailedReportsOnNewWindows=1
Expires=0
MaxRowsInHTMLOutput=1000
Lang=”auto”
DirLang=”./lang”
ShowMenu=1
ShowSummary=UVPHB
ShowMonthStats=UVPHB
ShowDaysOfMonthStats=VPHB
ShowDaysOfWeekStats=PHB
ShowHoursStats=PHB
ShowDomainsStats=PHB
ShowHostsStats=PHBL
ShowAuthenticatedUsers=0
ShowRobotsStats=HBL
ShowWormsStats=0
ShowEMailSenders=0
ShowEMailReceivers=0
ShowSessionsStats=1
ShowPagesStats=PBEX
ShowFileTypesStats=HB
ShowFileSizesStats=0
ShowOSStats=1
ShowBrowsersStats=1
ShowScreenSizeStats=0
ShowOriginStats=PH
ShowKeyphrasesStats=1
ShowKeywordsStats=1
ShowMiscStats=a
ShowHTTPErrorsStats=1
ShowSMTPErrorsStats=0
ShowClusterStats=0
AddDataArrayMonthStats=1
AddDataArrayShowDaysOfMonthStats=1
AddDataArrayShowDaysOfWeekStats=1
AddDataArrayShowHoursStats=1
IncludeInternalLinksInOriginSection=0
MaxNbOfDomain = 10
MinHitDomain = 1
MaxNbOfHostsShown = 10
MinHitHost = 1
MaxNbOfLoginShown = 10
MinHitLogin = 1
MaxNbOfRobotShown = 10
MinHitRobot = 1
MaxNbOfPageShown = 10
MinHitFile = 1
MaxNbOfOsShown = 10
MinHitOs = 1
MaxNbOfBrowsersShown = 10
MinHitBrowser = 1
MaxNbOfScreenSizesShown = 5
MinHitScreenSize = 1
MaxNbOfWindowSizesShown = 5
MinHitWindowSize = 1
MaxNbOfRefererShown = 10
MinHitRefer = 1
MaxNbOfKeyphrasesShown = 10
MinHitKeyphrase = 1
MaxNbOfKeywordsShown = 10
MinHitKeyword = 1
MaxNbOfEMailsShown = 20
MinHitEMail = 1
FirstDayOfWeek=1
ShowFlagLinks=”"
ShowLinksOnUrl=1
UseHTTPSLinkForUrl=”"
MaxLengthOfShownURL=64
HTMLHeadSection=”"
HTMLEndSection=”"
Logo=”awstats_logo6.png”
LogoLink=”http://awstats.sourceforge.net”
BarWidth = 260
BarHeight = 90
StyleSheet=”"
color_Background=”FFFFFF” # Background color for main page (Default = “FFFFFF”)
color_TableBGTitle=”CCCCDD” # Background color for table title (Default = “CCCCDD”)
color_TableTitle=”000000″ # Table title font color (Default = “000000″)
color_TableBG=”CCCCDD” # Background color for table (Default = “CCCCDD”)
color_TableRowTitle=”FFFFFF” # Table row title font color (Default = “FFFFFF”)
color_TableBGRowTitle=”ECECEC” # Background color for row title (Default = “ECECEC”)
color_TableBorder=”ECECEC” # Table border color (Default = “ECECEC”)
color_text=”000000″ # Color of text (Default = “000000″)
color_textpercent=”606060″ # Color of text for percent values (Default = “606060″)
color_titletext=”000000″ # Color of text title within colored Title Rows (Default = “000000″)
color_weekend=”EAEAEA” # Color for week-end days (Default = “EAEAEA”)
color_link=”0011BB” # Color of HTML links (Default = “0011BB”)
color_hover=”605040″ # Color of HTML on-mouseover links (Default = “605040″)
color_u=”FFAA66″ # Background color for number of unique visitors (Default = “FFAA66″)
color_v=”F4F090″ # Background color for number of visites (Default = “F4F090″)
color_p=”4477DD” # Background color for number of pages (Default = “4477DD”)
color_h=”66DDEE” # Background color for number of hits (Default = “66DDEE”)
color_k=”2EA495″ # Background color for number of bytes (Default = “2EA495″)
color_s=”8888DD” # Background color for number of search (Default = “8888DD”)
color_e=”CEC2E8″ # Background color for number of entry pages (Default = “CEC2E8″)
color_x=”C1B2E2″ # Background color for number of exit pages (Default = “C1B2E2″)
ExtraTrackedRowsLimit=500

Update Script

#!/bin/bash
cd /etc/awstats
webserver_user=daemon

for each in `ls -1 –color=none /vhosts` ; do
if [ X"$1" = "Xclean" ] ; then
rm -rf /vhosts/$each/htdocs/stats
fi
if [ ! -d /vhosts/$each/htdocs/stats ] ; then
mkdir /vhosts/$each/htdocs/stats
fi
chown -R $webserver_user /vhosts/$each/htdocs/stats
cat awstats.REPLACE_ME.conf | sed s,REPLACE_ME,$each,g > awstats.$each.conf
su $webserver_user -c “/opt/awstats/wwwroot/cgi-bin/awstats.pl -update -config=$each”
done

touch update_awstats.lastrun
March 17, 2009

Extreme Summit 48i Server Load Balancing HOWTO

Filed under: Device Configuration — admin @ 7:34 pm

Concept and Network layout


Background

I have a client, who has a client, who has a client blah blah blah…

Unnamed Client – “We need a powerful webserver farm, and have a 10k budget for this project. We’ve already got a rack, and plenty of bandwidth. What do you recommend?”

Network Layout

Basic Newtork Layout

Basic Network Layout

Devices – Switch / Load Balancer

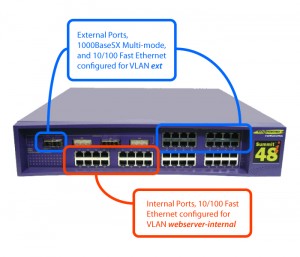
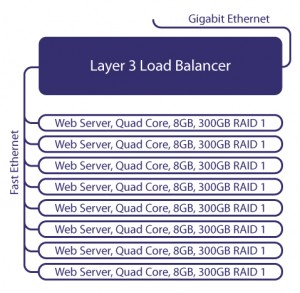
Among the list of their assets was a Summit 48i to work with. So, I have to work this device into the equation. Finding out that it had a Full layer 3 license was nice, because it would allow us to do Server Load Balancing.

Extreme Summit 48i Configuration

Extreme Summit 48i Configuration

The plan, setup a network with several web servers. The WANSecurity application servers do a great job for this. They’re fast, reliable and inexpensive. We’ll use the WANS-APP-1K for this which is a Quad Core processor with 8 GB of ram, 320GB RAID 1, and two on-board GigE interfaces.

Devices – Web Server

WANSecurity Application Server configured as a Web Server

WANSecurity Application Server configured as a Web Server

Switch Configuration

base configuration

In this case it was a good idea to completely erase all previous configuration from the switch. So that’s what I did.

unconfigure switch all

We have to setup a default base configuration on the switch. First we’ll create a VLAN, assign it an IP address and enable IP routing for it, and the default VLAN, and finally set a default gateway for outbound traffic.

create vlan “ext”
configure vlan “ext” ipaddress 198.117.0.10 255.255.255.128
configure vlan “ext” add port 1 untagged
enable ipforwarding vlan “Default”
enable ipforwarding vlan “ext”
configure iproute add default 198.117.0.1 1

server load balancing configuration

First we’ll create a VLAN (webserver-internal) for all of the web servers to be connected to, and we’ll assign the VLAN an IP address.

create vlan “webserver-internal”
configure vlan “webserver-internal” ipaddress 172.16.166.254 255.255.255.0

Summit48si:21 #
* Summit48si:21 # create vlan “webserver-internal”
* Summit48si:22 # configure vlan “webserver-internal” ipaddress 172.16.166.254 255.255.255.0
IP interface for VLAN webserver-internal has been created.
IP address = 172.16.166.254, Netmask = 255.255.255.0.
* Summit48si:23 #

Next, we’ll assign interface ports to the VLAN (webserver-internal)

configure vlan webserver-internal add port 17
configure vlan webserver-internal add port 18
configure vlan webserver-internal add port 19
configure vlan webserver-internal add port 20
configure vlan webserver-internal add port 21
configure vlan webserver-internal add port 22
configure vlan webserver-internal add port 23
configure vlan webserver-internal add port 24
configure vlan webserver-internal add port 25
configure vlan webserver-internal add port 26
configure vlan webserver-internal add port 27
configure vlan webserver-internal add port 28
configure vlan webserver-internal add port 29
configure vlan webserver-internal add port 30
configure vlan webserver-internal add port 31
configure vlan webserver-internal add port 32

Now, we’ll enable server load balancing with the command enable slb, and tell the switch what type of server load balancing will be on each VLAN. Clients connect to “ext” and “Default”. Servers connect to “webserver-internal” VLAN.

enable ipforwarding
enable slb
configure vlan webserver-internal slb-type server
configure vlan ext slb-type client
configure vlan Default slb-type client
create slb pool web-pool lb-method least-connections
configure slb webservers add 172.16.166.1 : http
configure slb webservers add 172.16.166.2 : http
configure slb webservers add 172.16.166.3 : http
configure slb webservers add 172.16.166.4 : http
configure slb webservers add 172.16.166.5 : http
configure slb webservers add 172.16.166.6 : http
configure slb webservers add 172.16.166.7 : http
configure slb webservers add 172.16.166.8 : http
configure slb webservers add 172.16.166.9 : http
configure slb webservers add 172.16.166.10 : http
create slb vip webserver pool webservers mode translation 198.117.0.10 : http

Client Configuration

Linux (Ubuntu) Network Configuration

Finally, we configure our webservers for the webservers-internal VLAN.

cat /etc/network/interfaces

# This file describes the network interfaces available on your system
# and how to activate them. For more information, see interfaces(5).
# The loopback network interface
auto lo
iface lo inet loopback
# The primary network interface
auto eth0
iface eth0 inet static
address 172.16.166.1
netmask 255.255.255.0
network 172.16.166.0
broadcast 172.16.166.255
gateway 172.16.166.254

All set, customer is ready to configure their web servers as they see fit.

Enjoy!


Linux iSCSI target compile HOWTO

Filed under: Server Technology — admin @ 5:27 pm

This will probably work just fine on other linux distributions as well such as Fedora, CentOS, and even Slackware. These notes are from my installation on Ubuntu Server 8.10 (Intrepid Ibex) amd64. Btw, this server will act an an iSCSI Target for Xen Virtualization.

iSCSI

  • All major server distributions support iSCSI
  • iSCSI is based on open standards
  • iSCSI is often a requirement for people setting up virtual machines
  • iSCSI is the most inexpensive way to build a SAN

The question is now do I go with LIO or IET?

EIT appears to me to be the most mature software. I’ll use it.

So I download it from sourceforge: iscsitarget-04.17.tar.gz

I want to build this on a solid fresh base, and so I’ll do an apt-get update and an apt-get upgrade to make sure I’ve got all of the latest software, libraries, and header files.

Turns out that on this installation of Ubuntu Server, I don’t have “make” installed.

I’ll use apt-get install build-essential to update my system with all the goodies that I’ll need to build the system. Stuff like gcc, make, binutils, g++ and so forth.

I extract the iscsitarget to /usr/src, and cd /usr/src/iscsitarget-0.4.17, and issue the make command.

I get an error right off the bat:

chap.c:20:25: error: openssl/sha.h: No such file or directory
chap.c:21:25: error: openssl/md5.h: No such file or directory
chap.c: In function ‘chap_calc_digest_md5’:

Looks like I need the openssl development headers installed. Simply: apt-get install libssl-dev

Let’s try make again. Okay another error, but we’ve made some progress:

make -C /lib/modules/2.6.27-7-server/build SUBDIRS=/usr/src/iscsitarget-0.4.17/kernel modules
make: *** /lib/modules/2.6.27-7-server/build: No such file or directory. Stop.
make: *** [kernel] Error 2

Let’s try again: apt-get install kernel-package linux-libc-dev linux-source linux-headers-`uname -r`

Is it there now? /lib/modules/$(uname -r)/build

Yes! apt-get is so cool!

For Redhat/CentOS based OSs try yum -y install gcc openssl-devel kernel-devel

Try again: make clean && make

root@opennas-kc01:/usr/src/iscsitarget-0.4.17# make clean && make
make -C usr clean
make[1]: Entering directory `/usr/src/iscsitarget-0.4.17/usr’
rm -f *.o ietd ietadm
make[1]: Leaving directory `/usr/src/iscsitarget-0.4.17/usr’
make -C /lib/modules/2.6.27-7-server/build SUBDIRS=/usr/src/iscsitarget-0.4.17/kernel clean
make[1]: Entering directory `/usr/src/linux-headers-2.6.27-7-server’
CLEAN /usr/src/iscsitarget-0.4.17/kernel/.tmp_versions
CLEAN /usr/src/iscsitarget-0.4.17/kernel/Module.symvers
make[1]: Leaving directory `/usr/src/linux-headers-2.6.27-7-server’
make -C usr
make[1]: Entering directory `/usr/src/iscsitarget-0.4.17/usr’
cc -O2 -fno-inline -Wall -Wstrict-prototypes -g -I../include -D_GNU_SOURCE -c -o ietd.o ietd.c
cc -O2 -fno-inline -Wall -Wstrict-prototypes -g -I../include -D_GNU_SOURCE -c -o iscsid.o iscsid.c
cc -O2 -fno-inline -Wall -Wstrict-prototypes -g -I../include -D_GNU_SOURCE -c -o conn.o conn.c
cc -O2 -fno-inline -Wall -Wstrict-prototypes -g -I../include -D_GNU_SOURCE -c -o session.o session.c
cc -O2 -fno-inline -Wall -Wstrict-prototypes -g -I../include -D_GNU_SOURCE -c -o target.o target.c
cc -O2 -fno-inline -Wall -Wstrict-prototypes -g -I../include -D_GNU_SOURCE -c -o message.o message.c
cc -O2 -fno-inline -Wall -Wstrict-prototypes -g -I../include -D_GNU_SOURCE -c -o ctldev.o ctldev.c
cc -O2 -fno-inline -Wall -Wstrict-prototypes -g -I../include -D_GNU_SOURCE -c -o log.o log.c
cc -O2 -fno-inline -Wall -Wstrict-prototypes -g -I../include -D_GNU_SOURCE -c -o chap.o chap.c
cc -O2 -fno-inline -Wall -Wstrict-prototypes -g -I../include -D_GNU_SOURCE -c -o event.o event.c
event.c: In function ‘handle_iscsi_events’:
event.c:86: warning: format ‘%#lx’ expects type ‘long unsigned int’, but argument 4 has type ‘long long unsigned int’
event.c:91: warning: format ‘%#lx’ expects type ‘long unsigned int’, but argument 2 has type ‘long long unsigned int’
cc -O2 -fno-inline -Wall -Wstrict-prototypes -g -I../include -D_GNU_SOURCE -c -o param.o param.c
cc -O2 -fno-inline -Wall -Wstrict-prototypes -g -I../include -D_GNU_SOURCE -c -o plain.o plain.c
cc -O2 -fno-inline -Wall -Wstrict-prototypes -g -I../include -D_GNU_SOURCE -c -o isns.o isns.c
cc ietd.o iscsid.o conn.o session.o target.o message.o ctldev.o log.o chap.o event.o param.o plain.o isns.o -o ietd -lcrypto
cc -O2 -fno-inline -Wall -Wstrict-prototypes -g -I../include -D_GNU_SOURCE -c -o ietadm.o ietadm.c
cc ietadm.o param.o -o ietadm
make[1]: Leaving directory `/usr/src/iscsitarget-0.4.17/usr’
make -C /lib/modules/2.6.27-7-server/build SUBDIRS=/usr/src/iscsitarget-0.4.17/kernel modules
make[1]: Entering directory `/usr/src/linux-headers-2.6.27-7-server’
CC [M] /usr/src/iscsitarget-0.4.17/kernel/tio.o
CC [M] /usr/src/iscsitarget-0.4.17/kernel/iscsi.o
CC [M] /usr/src/iscsitarget-0.4.17/kernel/nthread.o
CC [M] /usr/src/iscsitarget-0.4.17/kernel/wthread.o
CC [M] /usr/src/iscsitarget-0.4.17/kernel/config.o
CC [M] /usr/src/iscsitarget-0.4.17/kernel/digest.o
CC [M] /usr/src/iscsitarget-0.4.17/kernel/conn.o
CC [M] /usr/src/iscsitarget-0.4.17/kernel/session.o
CC [M] /usr/src/iscsitarget-0.4.17/kernel/target.o
CC [M] /usr/src/iscsitarget-0.4.17/kernel/volume.o
CC [M] /usr/src/iscsitarget-0.4.17/kernel/iotype.o
CC [M] /usr/src/iscsitarget-0.4.17/kernel/file-io.o
CC [M] /usr/src/iscsitarget-0.4.17/kernel/null-io.o
CC [M] /usr/src/iscsitarget-0.4.17/kernel/target_disk.o
CC [M] /usr/src/iscsitarget-0.4.17/kernel/event.o
CC [M] /usr/src/iscsitarget-0.4.17/kernel/param.o
CC [M] /usr/src/iscsitarget-0.4.17/kernel/block-io.o
LD [M] /usr/src/iscsitarget-0.4.17/kernel/iscsi_trgt.o
Building modules, stage 2.
MODPOST 1 modules
CC /usr/src/iscsitarget-0.4.17/kernel/iscsi_trgt.mod.o
LD [M] /usr/src/iscsitarget-0.4.17/kernel/iscsi_trgt.ko
make[1]: Leaving directory `/usr/src/linux-headers-2.6.27-7-server’
root@opennas-kc01:/usr/src/iscsitarget-0.4.17#

root@opennas-kc01:/usr/src/iscsitarget-0.4.17# make install
`usr/ietd’ -> `/usr/sbin/ietd’
`usr/ietadm’ -> `/usr/sbin/ietadm’
`etc/initd/initd.debian’ -> `/etc/init.d/iscsi-target’
`etc/ietd.conf’ -> `/etc/ietd.conf’
`etc/initiators.allow’ -> `/etc/initiators.allow’
`etc/initiators.deny’ -> `/etc/initiators.deny’
`doc/manpages/ietadm.8′ -> `/usr/share/man/man8/ietadm.8′
`doc/manpages/ietd.8′ -> `/usr/share/man/man8/ietd.8′
`doc/manpages/ietd.conf.5′ -> `/usr/share/man/man5/ietd.conf.5′
install: creating directory `/usr/share/doc/iscsitarget’
`ChangeLog’ -> `/usr/share/doc/iscsitarget/ChangeLog’
`COPYING’ -> `/usr/share/doc/iscsitarget/COPYING’
`README’ -> `/usr/share/doc/iscsitarget/README’
`README.vmware’ -> `/usr/share/doc/iscsitarget/README.vmware’
install: creating directory `/lib/modules/2.6.27-7-server/kernel/iscsi’
`kernel/iscsi_trgt.ko’ -> `/lib/modules/2.6.27-7-server/kernel/iscsi/iscsi_trgt.ko’
Running depmod
root@opennas-kc01:/usr/src/iscsitarget-0.4.17#

I run the start command: /etc/init.d/iscsi-target start && tail /var/log/messages

And I see good stuff:

Mar 17 00:09:22 opennas-kc01 kernel: [15876.392301] iSCSI Enterprise Target Software – version 0.4.15
Mar 17 00:09:22 opennas-kc01 kernel: [15876.392404] iscsi_trgt: Registered io type fileio
Mar 17 00:09:22 opennas-kc01 kernel: [15876.392407] iscsi_trgt: Registered io type blockio
Mar 17 00:09:22 opennas-kc01 kernel: [15876.392410] iscsi_trgt: Registered io type nullio

Configuration

man ietd.conf

From the ietd.conf manpage:

DESCRIPTION
/etc/ietd.conf contains configuration information for the ietd (8) command. This is the place, where you configure your iSCSI
targets and daemon defaults.

Only lines starting with ‘#’ are ignored. Putting ’#’ in the middle of a line is disallowed. A line may be extended across multi‐
ple lines by making the last character a backslash.

The “Yes” and “No” for parameter values are case sensitive. The parameter names are case insensitive.

The file consists of a global part and zero or more “Target” stanzas. Everything until the first target definition belongs to the
global configuration.

Here is an example:

IncomingUser joe secret
OutgoingUser jack secret2

Target iqn.2001-04.com.example:storage.disk2.sys1.xyz
IncomingUser jim othersecret
OutgoingUser james yetanothersecret
Lun 0 Path=/dev/sdc,Type=fileio
Lun 1 Sectors=10000,Type=nullio
Alias Test
HeaderDigest None
DataDigest None
MaxConnections 1
InitialR2T Yes
ImmediateData No
MaxRecvDataSegmentLength 8192
MaxXmitDataSegmentLength 8192
MaxBurstLength 262144
FirstBurstLength 65536
DefaultTime2Wait 2
DefaultTime2Retain 20
MaxOutstandingR2T 8
DataPDUInOrder Yes
DataSequenceInOrder Yes
ErrorRecoveryLevel 0

Stanzas start with the word “Target” and the target name. This name must be a globally unique name, as defined by the iSCSI stan‐
dard : the “iSCSI Qualified Name”. The daemon brings the targets up in the order listed.

In the following example configuration I used an LVM device (/dev/mapper/lvmxen-capacity–root) it could have been any other block device however such as /dev/sdb1.

Target iqn.2001-10.org.toddsmith:storage.vps.mac.blacktop
IncomingUser toddin 012345678901
OutgoingUser toddout 012345678901
Lun 0 Path=/dev/mapper/lvmxen-capacity–root,Type=fileio,ScsiId=Sup3rSCS1D3V1C31

The IncomingUser is used for iSCSI initiator discovery, and outgoing user authenticates the iSCSI target server to the initiator client. Hint, the RFC specifies that the password must be exactly 12 characters.

I hope you found this HOWTO useful.

March 16, 2009

iSCSI over LVM Target HOWTO & OS X Initiator

Filed under: Server Technology — admin @ 11:47 pm

This HOWTO is on Ubuntu but should be very similar for Fedora, or Slackware based Linux boxen.

Install LVM

First I need the lvm stuff installed apt-get install lvm2

Make sure to reboot at this point to device mapper can be loaded into the kernel and properly setup.

Setup a Physical Device for LVM

root@opennas-kc01:/usr/src/iscsitarget-0.4.17# fdisk -l

Disk /dev/sda: 29.9 GB, 29999759360 bytes
255 heads, 63 sectors/track, 3647 cylinders
Units = cylinders of 16065 * 512 = 8225280 bytes
Disk identifier: 0x000d0541

   Device Boot      Start         End      Blocks   Id  System
/dev/sda1   *           1          24      192748+  83  Linux
/dev/sda2              25        3404    27149850   83  Linux
/dev/sda3            3405        3647     1951897+   5  Extended
/dev/sda5            3405        3647     1951866   82  Linux swap / Solaris

Disk /dev/sdb: 1969.9 GB, 1969999577088 bytes
64 heads, 32 sectors/track, 1878738 cylinders
Units = cylinders of 2048 * 512 = 1048576 bytes
Disk identifier: 0x00000000

Disk /dev/sdb doesn't contain a valid partition table
root@opennas-kc01:/usr/src/iscsitarget-0.4.17#

Let’s configure this disk.

root@opennas-kc01:/usr/src/iscsitarget-0.4.17# fdisk /dev/sdb
Device contains neither a valid DOS partition table, nor Sun, SGI or OSF disklabel
Building a new DOS disklabel with disk identifier 0x75450acd.
Changes will remain in memory only, until you decide to write them.
After that, of course, the previous content won't be recoverable.

The number of cylinders for this disk is set to 1878738.
There is nothing wrong with that, but this is larger than 1024,
and could in certain setups cause problems with:
1) software that runs at boot time (e.g., old versions of LILO)
2) booting and partitioning software from other OSs
   (e.g., DOS FDISK, OS/2 FDISK)
Warning: invalid flag 0x0000 of partition table 4 will be corrected by w(rite)

Command (m for help): p

Disk /dev/sdb: 1969.9 GB, 1969999577088 bytes
64 heads, 32 sectors/track, 1878738 cylinders
Units = cylinders of 2048 * 512 = 1048576 bytes
Disk identifier: 0x75450acd

   Device Boot      Start         End      Blocks   Id  System

Command (m for help): n
Command action
   e   extended
   p   primary partition (1-4)
p
Partition number (1-4): 1
First cylinder (1-1878738, default 1):
Using default value 1
Last cylinder, +cylinders or +size{K,M,G} (1-1878738, default 1878738):
Using default value 1878738

Command (m for help): t
Selected partition 1
Hex code (type L to list codes): l

 0  Empty           1e  Hidden W95 FAT1 80  Old Minix       bf  Solaris
 1  FAT12           24  NEC DOS         81  Minix / old Lin c1  DRDOS/sec (FAT-
 2  XENIX root      39  Plan 9          82  Linux swap / So c4  DRDOS/sec (FAT-
 3  XENIX usr       3c  PartitionMagic  83  Linux           c6  DRDOS/sec (FAT-
 4  FAT16 <32M      40  Venix 80286     84  OS/2 hidden C:  c7  Syrinx
 5  Extended        41  PPC PReP Boot   85  Linux extended  da  Non-FS data
 6  FAT16           42  SFS             86  NTFS volume set db  CP/M / CTOS / .
 7  HPFS/NTFS       4d  QNX4.x          87  NTFS volume set de  Dell Utility
 8  AIX             4e  QNX4.x 2nd part 88  Linux plaintext df  BootIt
 9  AIX bootable    4f  QNX4.x 3rd part 8e  Linux LVM       e1  DOS access
 a  OS/2 Boot Manag 50  OnTrack DM      93  Amoeba          e3  DOS R/O
 b  W95 FAT32       51  OnTrack DM6 Aux 94  Amoeba BBT      e4  SpeedStor
 c  W95 FAT32 (LBA) 52  CP/M            9f  BSD/OS          eb  BeOS fs
 e  W95 FAT16 (LBA) 53  OnTrack DM6 Aux a0  IBM Thinkpad hi ee  GPT
 f  W95 Ext'd (LBA) 54  OnTrackDM6      a5  FreeBSD         ef  EFI (FAT-12/16/
10  OPUS            55  EZ-Drive        a6  OpenBSD         f0  Linux/PA-RISC b
11  Hidden FAT12    56  Golden Bow      a7  NeXTSTEP        f1  SpeedStor
12  Compaq diagnost 5c  Priam Edisk     a8  Darwin UFS      f4  SpeedStor
14  Hidden FAT16 <3 61  SpeedStor       a9  NetBSD          f2  DOS secondary
16  Hidden FAT16    63  GNU HURD or Sys ab  Darwin boot     fb  VMware VMFS
17  Hidden HPFS/NTF 64  Novell Netware  b7  BSDI fs         fc  VMware VMKCORE
18  AST SmartSleep  65  Novell Netware  b8  BSDI swap       fd  Linux raid auto
1b  Hidden W95 FAT3 70  DiskSecure Mult bb  Boot Wizard hid fe  LANstep
1c  Hidden W95 FAT3 75  PC/IX           be  Solaris boot    ff  BBT
Hex code (type L to list codes): 8e
Changed system type of partition 1 to 8e (Linux LVM)

Command (m for help): p

Disk /dev/sdb: 1969.9 GB, 1969999577088 bytes
64 heads, 32 sectors/track, 1878738 cylinders
Units = cylinders of 2048 * 512 = 1048576 bytes
Disk identifier: 0x75450acd

   Device Boot      Start         End      Blocks   Id  System
/dev/sdb1               1     1878738  1923827696   8e  Linux LVM

Command (m for help): w
The partition table has been altered!

Calling ioctl() to re-read partition table.
Syncing disks.
root@opennas-kc01:/usr/src/iscsitarget-0.4.17#

Let’s see what she looks like now:
fdisk -l /dev/sdb

root@opennas-kc01:/usr/src/iscsitarget-0.4.17# fdisk -l /dev/sdb

Disk /dev/sdb: 1969.9 GB, 1969999577088 bytes
64 heads, 32 sectors/track, 1878738 cylinders
Units = cylinders of 2048 * 512 = 1048576 bytes
Disk identifier: 0x75450acd

   Device Boot      Start         End      Blocks   Id  System
/dev/sdb1               1     1878738  1923827696   8e  Linux LVM
root@opennas-kc01:/usr/src/iscsitarget-0.4.17#

Setup a Physical Volume in LVM

Now that we’ve created a partition and set the partition type to Linux LVM we can create a “Physical Volume” on the block device using pvcreate

pvcreate -M2 -v /dev/sdb1

root@opennas-kc01:/usr/src/iscsitarget-0.4.17# pvcreate -v /dev/sdb1
    Set up physical volume for "/dev/sdb1" with 3847655392 available sectors
    Zeroing start of device /dev/sdb1
  Physical volume "/dev/sdb1" successfully created
root@opennas-kc01:/usr/src/iscsitarget-0.4.17#

vgcreate lvmxen /dev/sdb1

Yields

  Volume group "lvmxen" successfully created

pvdisplay -v

root@opennas-kc01:/usr/src/iscsitarget-0.4.17# pvdisplay -v
    Scanning for physical volume names
  --- Physical volume ---
  PV Name               /dev/sdb1
  VG Name               lvmxen
  PV Size               1.79 TB / not usable 1.98 MB
  Allocatable           yes
  PE Size (KByte)       4096
  Total PE              469684
  Free PE               469684
  Allocated PE          0
  PV UUID               yparc3-Rqv1-Dlua-VH3F-o7tX-eYpK-2fMRiV
root@opennas-kc01:/usr/src/iscsitarget-0.4.17#

vgdisplay now finds all our Volume Groups

root@opennas-kc01:/usr/src/iscsitarget-0.4.17# vgdisplay -v
    Finding all volume groups
    Finding volume group "lvmxen"
  --- Volume group ---
  VG Name               lvmxen
  System ID
  Format                lvm2
  Metadata Areas        1
  Metadata Sequence No  1
  VG Access             read/write
  VG Status             resizable
  MAX LV                0
  Cur LV                0
  Open LV               0
  Max PV                0
  Cur PV                1
  Act PV                1
  VG Size               1.79 TB
  PE Size               4.00 MB
  Total PE              469684
  Alloc PE / Size       0 / 0
  Free  PE / Size       469684 / 1.79 TB
  VG UUID               hbEvWz-aLuX-TJ0H-ll6h-4NrV-FmN3-wsSWAe

  --- Physical volumes ---
  PV Name               /dev/sdb1
  PV UUID               yparc3-Rqv1-Dlua-VH3F-o7tX-eYpK-2fMRiV
  PV Status             allocatable
  Total PE / Free PE    469684 / 469684

root@opennas-kc01:/usr/src/iscsitarget-0.4.17#

In order to have these available at boot time we need to run vgscan

I just whipped up a little script to startup my LVM stuff on bootup:

cat /etc/init.d/lvm

#!/bin/sh

case "$1" in
  start)
        /sbin/vgscan --ignorelockingfailure
        /sbin/vgchange -ay --ignorelockingfailure
        ;;
  stop)
        /sbin/vgchange -an
        ;;
  restart|force-reload)
        ;;
esac

exit 0

Create Logical Volumes

Now we’ll create a logical volume in the volume group lvmxen.

This particular volume is being created to export to a Xen VPS named capacity, although I’ll be testing with OS X. This will be a 15GB filesystem. I chose the `hostname`-filesystem naming convention in order to make it easy for me to manage the large number of volume groups I’ll have. You can name it whatever you like:

lvcreate -L15G -n capacity-root lvmxen

Configure iSCSI Target

vi /etc/ietd.conf

Target iqn.2001-10.org.toddsmith:storage.vps.mac.blacktop
        IncomingUser    toddin 012345678901
        OutgoingUser    toddout 012345678901
        Lun 0 Path=/dev/mapper/lvmxen-capacity--root,Type=fileio,ScsiId=Sup3rSCS1D3V1C31

Unfortunately the iscsi-target init script could still use some help because it’s not properly unloading all of the modules when we run /etc/init.d/iscsi-target stop

Just reboot your system after making changes to the /etc/ietd.conf file for now.

Connecting to the iSCSI target

For this example I’m going to use Mac OS X. Yes, my favorite for about 10 years now.

There is a nice semi-free implementation of iSCSI initiator for OS X. Called globalSAN. You can download it from the manufacturers site at http://www.studionetworksolutions.com/products/product_detail.php?pi=11.

Install the software on your Mac and Reboot.

Under your control panel you’ll see a new icon. Cool.

New Control Panel option for globalSAN iSCSI

New Control Panel option for globalSAN iSCSI

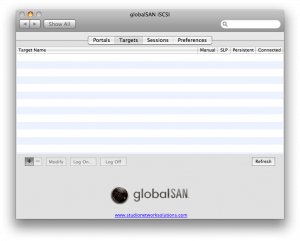
Go into the <i>globalSAN iSCSI</i> control panel and create a new target.

Click target

Click Targets

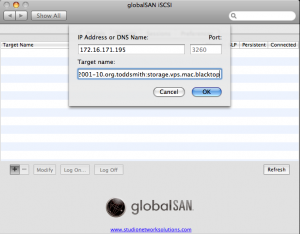
Click the <i>+</i> to add a new iSCSI target.

iSCSI target configuration. Need the "iSCSI Qualified Name" here

iSCSI target configuration. Need the "iSCSI Qualified Name" here

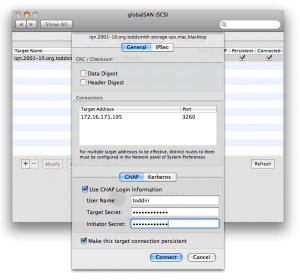
Okay now we have to setup the authentication with CHAP using the same credential information we put in our target definition.

CHAP credentials (HINT: RFC 3720 requires <password> to be 12 characters long. This is enforced e.g. by MS Initiator.)

CHAP credentials (HINT: RFC 3720 requires to be 12 characters long. This is enforced e.g. by MS Initiator.)

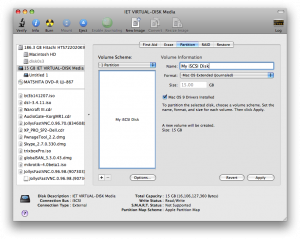
Now a new disk will suddenly appear, and your Mac will tell you that the disk is unreadable. Click <i>Initialize Disk</i> and it will open up the Disk Utility. You’ll see a new disk in the upper left hand corner called “IET VIRTUAL-DISK Media”. Partition it.

Now we're ready to partition and format the disk.

Now we're ready to partition and format the disk.

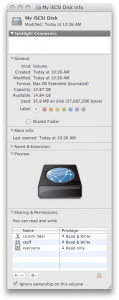
After the partitioning has been complete you’ll now have a new disk mounted on your desktop. Here’s what <i>Get Info</i> shows.

Get Info on our new IET Disk shows that the disk has almost 15GB usable. On my Gigabit LAN, this disk is *VERY* Fast.

Get Info on our new IET Disk shows that the disk has almost 15GB usable. On my Gigabit LAN, this disk is *VERY* Fast.

If anyone can think of anything to make this HOWTO a little better, please let me know.

Enjoy!

Cheers!

Powered by WordPress