This HOWTO is on Ubuntu but should be very similar for Fedora, or Slackware based Linux boxen.
Install LVM
First I need the lvm stuff installed apt-get install lvm2
Make sure to reboot at this point to device mapper can be loaded into the kernel and properly setup.
Setup a Physical Device for LVM
root@opennas-kc01:/usr/src/iscsitarget-0.4.17# fdisk -l

Disk /dev/sda: 29.9 GB, 29999759360 bytes
255 heads, 63 sectors/track, 3647 cylinders
Units = cylinders of 16065 * 512 = 8225280 bytes
Disk identifier: 0x000d0541

   Device Boot      Start         End      Blocks   Id  System
/dev/sda1   *           1          24      192748+  83  Linux
/dev/sda2              25        3404    27149850   83  Linux
/dev/sda3            3405        3647     1951897+   5  Extended
/dev/sda5            3405        3647     1951866   82  Linux swap / Solaris

Disk /dev/sdb: 1969.9 GB, 1969999577088 bytes
64 heads, 32 sectors/track, 1878738 cylinders
Units = cylinders of 2048 * 512 = 1048576 bytes
Disk identifier: 0x00000000

Disk /dev/sdb doesn't contain a valid partition table
root@opennas-kc01:/usr/src/iscsitarget-0.4.17#
Let’s configure this disk.
root@opennas-kc01:/usr/src/iscsitarget-0.4.17# fdisk /dev/sdb
Device contains neither a valid DOS partition table, nor Sun, SGI or OSF disklabel
Building a new DOS disklabel with disk identifier 0x75450acd.
Changes will remain in memory only, until you decide to write them.
After that, of course, the previous content won't be recoverable.

The number of cylinders for this disk is set to 1878738.
There is nothing wrong with that, but this is larger than 1024,
and could in certain setups cause problems with:
1) software that runs at boot time (e.g., old versions of LILO)
2) booting and partitioning software from other OSs
   (e.g., DOS FDISK, OS/2 FDISK)
Warning: invalid flag 0x0000 of partition table 4 will be corrected by w(rite)

Command (m for help): p

Disk /dev/sdb: 1969.9 GB, 1969999577088 bytes
64 heads, 32 sectors/track, 1878738 cylinders
Units = cylinders of 2048 * 512 = 1048576 bytes
Disk identifier: 0x75450acd

   Device Boot      Start         End      Blocks   Id  System

Command (m for help): n
Command action
   e   extended
   p   primary partition (1-4)
p
Partition number (1-4): 1
First cylinder (1-1878738, default 1):
Using default value 1
Last cylinder, +cylinders or +size{K,M,G} (1-1878738, default 1878738):
Using default value 1878738

Command (m for help): t
Selected partition 1
Hex code (type L to list codes): l

 0  Empty           1e  Hidden W95 FAT1 80  Old Minix       bf  Solaris
 1  FAT12           24  NEC DOS         81  Minix / old Lin c1  DRDOS/sec (FAT-
 2  XENIX root      39  Plan 9          82  Linux swap / So c4  DRDOS/sec (FAT-
 3  XENIX usr       3c  PartitionMagic  83  Linux           c6  DRDOS/sec (FAT-
 4  FAT16 <32M      40  Venix 80286     84  OS/2 hidden C:  c7  Syrinx
 5  Extended        41  PPC PReP Boot   85  Linux extended  da  Non-FS data
 6  FAT16           42  SFS             86  NTFS volume set db  CP/M / CTOS / .
 7  HPFS/NTFS       4d  QNX4.x          87  NTFS volume set de  Dell Utility
 8  AIX             4e  QNX4.x 2nd part 88  Linux plaintext df  BootIt
 9  AIX bootable    4f  QNX4.x 3rd part 8e  Linux LVM       e1  DOS access
 a  OS/2 Boot Manag 50  OnTrack DM      93  Amoeba          e3  DOS R/O
 b  W95 FAT32       51  OnTrack DM6 Aux 94  Amoeba BBT      e4  SpeedStor
 c  W95 FAT32 (LBA) 52  CP/M            9f  BSD/OS          eb  BeOS fs
 e  W95 FAT16 (LBA) 53  OnTrack DM6 Aux a0  IBM Thinkpad hi ee  GPT
 f  W95 Ext'd (LBA) 54  OnTrackDM6      a5  FreeBSD         ef  EFI (FAT-12/16/
10  OPUS            55  EZ-Drive        a6  OpenBSD         f0  Linux/PA-RISC b
11  Hidden FAT12    56  Golden Bow      a7  NeXTSTEP        f1  SpeedStor
12  Compaq diagnost 5c  Priam Edisk     a8  Darwin UFS      f4  SpeedStor
14  Hidden FAT16 <3 61  SpeedStor       a9  NetBSD          f2  DOS secondary
16  Hidden FAT16    63  GNU HURD or Sys ab  Darwin boot     fb  VMware VMFS
17  Hidden HPFS/NTF 64  Novell Netware  b7  BSDI fs         fc  VMware VMKCORE
18  AST SmartSleep  65  Novell Netware  b8  BSDI swap       fd  Linux raid auto
1b  Hidden W95 FAT3 70  DiskSecure Mult bb  Boot Wizard hid fe  LANstep
1c  Hidden W95 FAT3 75  PC/IX           be  Solaris boot    ff  BBT
Hex code (type L to list codes): 8e
Changed system type of partition 1 to 8e (Linux LVM)

Command (m for help): p

Disk /dev/sdb: 1969.9 GB, 1969999577088 bytes
64 heads, 32 sectors/track, 1878738 cylinders
Units = cylinders of 2048 * 512 = 1048576 bytes
Disk identifier: 0x75450acd

   Device Boot      Start         End      Blocks   Id  System
/dev/sdb1               1     1878738  1923827696   8e  Linux LVM

Command (m for help): w
The partition table has been altered!

Calling ioctl() to re-read partition table.
Syncing disks.
root@opennas-kc01:/usr/src/iscsitarget-0.4.17#
Let’s see what she looks like now:
fdisk -l /dev/sdb
root@opennas-kc01:/usr/src/iscsitarget-0.4.17# fdisk -l /dev/sdb

Disk /dev/sdb: 1969.9 GB, 1969999577088 bytes
64 heads, 32 sectors/track, 1878738 cylinders
Units = cylinders of 2048 * 512 = 1048576 bytes
Disk identifier: 0x75450acd

   Device Boot      Start         End      Blocks   Id  System
/dev/sdb1               1     1878738  1923827696   8e  Linux LVM
root@opennas-kc01:/usr/src/iscsitarget-0.4.17#
Setup a Physical Volume in LVM
Now that we’ve created a partition and set the partition type to Linux LVM we can create a “Physical Volume” on the block device using pvcreate
pvcreate -M2 -v /dev/sdb1
root@opennas-kc01:/usr/src/iscsitarget-0.4.17# pvcreate -v /dev/sdb1
    Set up physical volume for "/dev/sdb1" with 3847655392 available sectors
    Zeroing start of device /dev/sdb1
  Physical volume "/dev/sdb1" successfully created
root@opennas-kc01:/usr/src/iscsitarget-0.4.17#
vgcreate lvmxen /dev/sdb1
Yields
Volume group "lvmxen" successfully created
pvdisplay -v
root@opennas-kc01:/usr/src/iscsitarget-0.4.17# pvdisplay -v
    Scanning for physical volume names
  --- Physical volume ---
  PV Name               /dev/sdb1
  VG Name               lvmxen
  PV Size               1.79 TB / not usable 1.98 MB
  Allocatable           yes
  PE Size (KByte)       4096
  Total PE              469684
  Free PE               469684
  Allocated PE          0
  PV UUID               yparc3-Rqv1-Dlua-VH3F-o7tX-eYpK-2fMRiV
root@opennas-kc01:/usr/src/iscsitarget-0.4.17#
vgdisplay now finds all our Volume Groups
root@opennas-kc01:/usr/src/iscsitarget-0.4.17# vgdisplay -v
    Finding all volume groups
    Finding volume group "lvmxen"
  --- Volume group ---
  VG Name               lvmxen
  System ID
  Format                lvm2
  Metadata Areas        1
  Metadata Sequence No  1
  VG Access             read/write
  VG Status             resizable
  MAX LV                0
  Cur LV                0
  Open LV               0
  Max PV                0
  Cur PV                1
  Act PV                1
  VG Size               1.79 TB
  PE Size               4.00 MB
  Total PE              469684
  Alloc PE / Size       0 / 0
  Free  PE / Size       469684 / 1.79 TB
  VG UUID               hbEvWz-aLuX-TJ0H-ll6h-4NrV-FmN3-wsSWAe

  --- Physical volumes ---
  PV Name               /dev/sdb1
  PV UUID               yparc3-Rqv1-Dlua-VH3F-o7tX-eYpK-2fMRiV
  PV Status             allocatable
  Total PE / Free PE    469684 / 469684

root@opennas-kc01:/usr/src/iscsitarget-0.4.17#
In order to have these available at boot time we need to run vgscan
I just whipped up a little script to startup my LVM stuff on bootup:
cat /etc/init.d/lvm
#!/bin/sh

case "$1" in
  start)
        /sbin/vgscan --ignorelockingfailure
        /sbin/vgchange -ay --ignorelockingfailure
        ;;
  stop)
        /sbin/vgchange -an
        ;;
  restart|force-reload)
        ;;
esac

exit 0
Create Logical Volumes
Now we’ll create a logical volume in the volume group lvmxen.
This particular volume is being created to export to a Xen VPS named capacity, although I’ll be testing with OS X. This will be a 15GB filesystem. I chose the `hostname`-filesystem naming convention in order to make it easy for me to manage the large number of volume groups I’ll have. You can name it whatever you like:
lvcreate -L15G -n capacity-root lvmxen
Configure iSCSI Target
vi /etc/ietd.conf
Target iqn.2001-10.org.toddsmith:storage.vps.mac.blacktop
        IncomingUser    toddin 012345678901
        OutgoingUser    toddout 012345678901
        Lun 0 Path=/dev/mapper/lvmxen-capacity--root,Type=fileio,ScsiId=Sup3rSCS1D3V1C31
Unfortunately the iscsi-target init script could still use some help because it’s not properly unloading all of the modules when we run /etc/init.d/iscsi-target stop
Just reboot your system after making changes to the /etc/ietd.conf file for now.
Connecting to the iSCSI target
For this example I’m going to use Mac OS X. Yes, my favorite for about 10 years now.
There is a nice semi-free implementation of iSCSI initiator for OS X. Called globalSAN. You can download it from the manufacturers site at http://www.studionetworksolutions.com/products/product_detail.php?pi=11.
Install the software on your Mac and Reboot.
Under your control panel you’ll see a new icon. Cool.
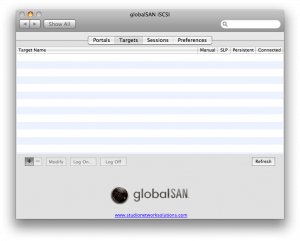
Go into the <i>globalSAN iSCSI</i> control panel and create a new target.
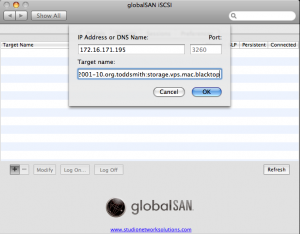
Click the <i>+</i> to add a new iSCSI target.
Okay now we have to setup the authentication with CHAP using the same credential information we put in our target definition.
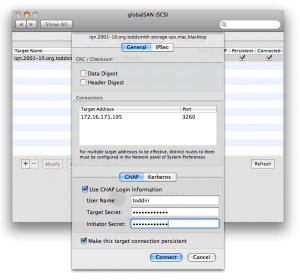
CHAP credentials (HINT: RFC 3720 requires to be 12 characters long. This is enforced e.g. by MS Initiator.)
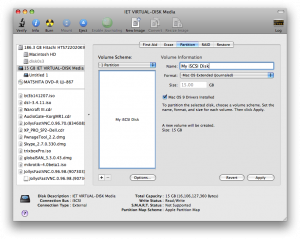
Now a new disk will suddenly appear, and your Mac will tell you that the disk is unreadable. Click <i>Initialize Disk</i> and it will open up the Disk Utility. You’ll see a new disk in the upper left hand corner called “IET VIRTUAL-DISK Media”. Partition it.
After the partitioning has been complete you’ll now have a new disk mounted on your desktop. Here’s what <i>Get Info</i> shows.
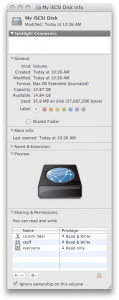
Get Info on our new IET Disk shows that the disk has almost 15GB usable. On my Gigabit LAN, this disk is *VERY* Fast.
If anyone can think of anything to make this HOWTO a little better, please let me know.
Enjoy!
Cheers!
