Concept and Network layout
Background
I have a client, who has a client, who has a client blah blah blah…
Unnamed Client – “We need a powerful webserver farm, and have a 10k budget for this project. We’ve already got a rack, and plenty of bandwidth. What do you recommend?”
Network Layout
Devices – Switch / Load Balancer
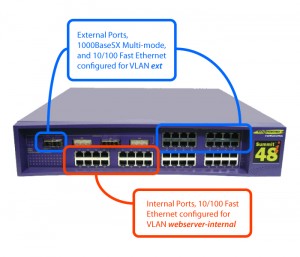
Among the list of their assets was a Summit 48i to work with. So, I have to work this device into the equation. Finding out that it had a Full layer 3 license was nice, because it would allow us to do Server Load Balancing.
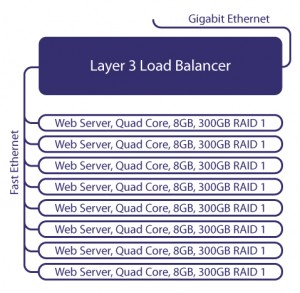
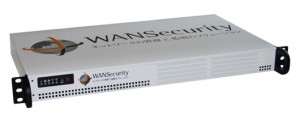
The plan, setup a network with several web servers. The WANSecurity application servers do a great job for this. They’re fast, reliable and inexpensive. We’ll use the WANS-APP-1K for this which is a Quad Core processor with 8 GB of ram, 320GB RAID 1, and two on-board GigE interfaces.
Devices – Web Server
Switch Configuration
base configuration
In this case it was a good idea to completely erase all previous configuration from the switch. So that’s what I did.
unconfigure switch all
We have to setup a default base configuration on the switch. First we’ll create a VLAN, assign it an IP address and enable IP routing for it, and the default VLAN, and finally set a default gateway for outbound traffic.
create vlan “ext”
configure vlan “ext” ipaddress 198.117.0.10 255.255.255.128
configure vlan “ext” add port 1 untagged
enable ipforwarding vlan “Default”
enable ipforwarding vlan “ext”
configure iproute add default 198.117.0.1 1
server load balancing configuration
First we’ll create a VLAN (webserver-internal) for all of the web servers to be connected to, and we’ll assign the VLAN an IP address.
create vlan “webserver-internal”
configure vlan “webserver-internal” ipaddress 172.16.166.254 255.255.255.0
Summit48si:21 #
* Summit48si:21 # create vlan “webserver-internal”
* Summit48si:22 # configure vlan “webserver-internal” ipaddress 172.16.166.254 255.255.255.0
IP interface for VLAN webserver-internal has been created.
IP address = 172.16.166.254, Netmask = 255.255.255.0.
* Summit48si:23 #
Next, we’ll assign interface ports to the VLAN (webserver-internal)
configure vlan webserver-internal add port 17
configure vlan webserver-internal add port 18
configure vlan webserver-internal add port 19
configure vlan webserver-internal add port 20
configure vlan webserver-internal add port 21
configure vlan webserver-internal add port 22
configure vlan webserver-internal add port 23
configure vlan webserver-internal add port 24
configure vlan webserver-internal add port 25
configure vlan webserver-internal add port 26
configure vlan webserver-internal add port 27
configure vlan webserver-internal add port 28
configure vlan webserver-internal add port 29
configure vlan webserver-internal add port 30
configure vlan webserver-internal add port 31
configure vlan webserver-internal add port 32
Now, we’ll enable server load balancing with the command enable slb, and tell the switch what type of server load balancing will be on each VLAN. Clients connect to “ext” and “Default”. Servers connect to “webserver-internal” VLAN.
enable ipforwarding
enable slb
configure vlan webserver-internal slb-type server
configure vlan ext slb-type client
configure vlan Default slb-type client
create slb pool web-pool lb-method least-connections
configure slb webservers add 172.16.166.1 : http
configure slb webservers add 172.16.166.2 : http
configure slb webservers add 172.16.166.3 : http
configure slb webservers add 172.16.166.4 : http
configure slb webservers add 172.16.166.5 : http
configure slb webservers add 172.16.166.6 : http
configure slb webservers add 172.16.166.7 : http
configure slb webservers add 172.16.166.8 : http
configure slb webservers add 172.16.166.9 : http
configure slb webservers add 172.16.166.10 : http
create slb vip webserver pool webservers mode translation 198.117.0.10 : http
Client Configuration
Linux (Ubuntu) Network Configuration
Finally, we configure our webservers for the webservers-internal VLAN.
cat /etc/network/interfaces
# This file describes the network interfaces available on your system
# and how to activate them. For more information, see interfaces(5).
# The loopback network interface
auto lo
iface lo inet loopback
# The primary network interface
auto eth0
iface eth0 inet static
address 172.16.166.1
netmask 255.255.255.0
network 172.16.166.0
broadcast 172.16.166.255
gateway 172.16.166.254
All set, customer is ready to configure their web servers as they see fit.
Enjoy!


